Pairing iOS Device & E285 Payment Device
Step 1
Enable the Hotspot on your iPhone
From Settings on iPhone, switch on the Hotspot
If its iPhone 12 or later, turn on ‘Maximise Compatibility‘
Make a note of the Hotspot name and password
Step 2
Make Hotspot Discoverable
1. Depending on your iPhone version:
- For iPhones with Face ID: Swipe down from the top right of the screen
- For iPhones with Home Button: Swipe up from the bottom left of the screen
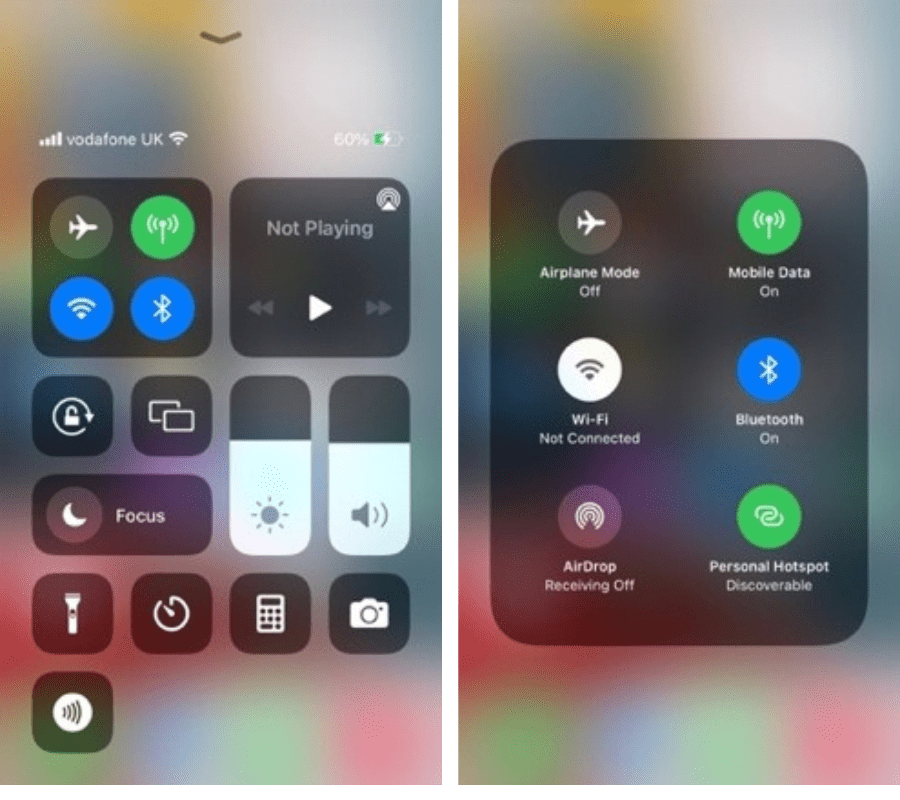
2. Tap and hold the centre of the icon panel to see more shortcut icons
- Wi-Fi should not be connected (icon should be white)
- Mobile Data should be connected (icon should be green)
- Make Personal Hotspot ‘Discoverable‘ (tap if necessary)
- If Personal Hotspot is already discoverable, switch it off and then switch it on again

Step 3
Configure the Wi-Fi on the e285 payment device
Switch on the e285 payment device
The screen displays Main Menu, indicating e285 payment device is powered on
Press option 3 and Enter Password screen will be displayed
Press keys ‘l’ ‘2’ ‘3’ ‘4’ ‘5’ followed by the green ‘O’ key
Supervisor menu is displayed. Now press 2 to go to Communication Panel
Click on Wi-Fi option then Configuration and finally click Wi-Fi Scan
Click on the Hotspot (Wi-Fi) name of your iPhone (click Refresh if the Hotspot name is still not showing)
Click on Add, then click on Pre-Shared-Key (PSK)
Enter the PSK (i.e. the Hotspot password of your iPhone) – Please note password is case sensitive.
For example, if the password is ‘TqZm789*’, then press the following:
Press 8 twice to display T, Press 1 five times to display q, Press 1 three times to display Z, Press 6 five times to display m, Press 7 once to display 7, Press 8 once to display 8, Press 9 once to display 9, Press 0 twelve times to display *
Click ‘OK’ then ‘Save’ then ‘OK’ and ‘Yes’ to Apply settings on interface
Connection Status
SAVED – If connection is success, then carry on with Step 12
If the connection fails ‘FAILED’ and if the reason is Wrong credentials, then follow below steps
i. Click ‘OK’ and then Click Configuration
ii. Click on the Wi-Fi Name then ‘Remove network’
iii. Click ‘Yes’ to Remove network and then Click ‘OK’
iv. Click Wi-Fi Scan and then follow instructions from Step 7 above
Now click ‘OK’ then click ‘Yes’ to apply settings
Click ‘OK’ to go back to WiFi menu – a Wi-Fi symbol should be displayed in the top left corner
Press the red ‘X’ key to display the Communication menu
Press the red ‘X’ key again to apply the settings
Press the red ‘X’ key again to exit the Supervisor Menu


